Hello there!
I have been dabbling around with JavaScript on and off for a year and a half; it was not until mid-December where I decided to start development on a game using the language. I've briefly mentioned about it in my other blog posts but never really went into depth about it; I want to keep it that way until it's release (~20th February), but I will tell you that it is a game much like Prelude of the Chambered (minus the 3d and violence).
The great thing that I've learned from making this game is how to create a custom engine and way of processing logic and rendering images to the screen and the such like. I did all of this without having to use C++; although I'd still love to make a custom engine in that language, I don't think I have the experience to make a fully-fledged game engine in such a language.
What I'll be talking about here is how I've managed to create pixel-perfect graphics within the engine I've created in JavaScript.
Preface
What do I mean by Pixel-perfect graphics?
By that I mean having pixel graphics where every singe pixel is in a consistent order, like a series of tiles, with the same width, height. Usually when it comes to increasing the screen resolution, you need to make the sprites, the world and the graphic user interface bigger so that the player can see more. Many would take the approach of increasing the size everything and increasing the width and height of which the images are drawn. However this approach would produce results like this:

Not too pretty.
You can see here that the pixels of the characters are not in line with each other, there are pixels that partially overlap with other pixels. There is not much depth in that at all, perhaps if this were a game which had less pixel-based graphics like vectors, then that would be completely fine because everything else has vector graphics. But here, the cohesiveness fails miserably. You need not worry though, I have found a solution to this problem.
Drawing with mosaic
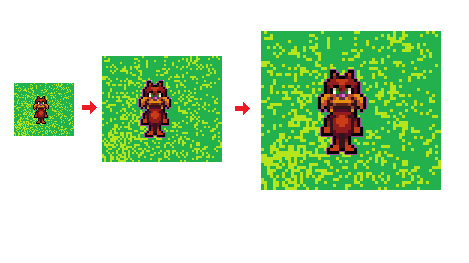
I'm pretty sure you may have seen mosaic art before, that art where each tile is placed in a square pattern. Trying to make the world seem bigger would be like trying to put a mosaic art that consist of 3cm tiles into mosaic art that consists of 1cm tiles. This may be fine if the size of the image is being resized for certain effects like this (the map below the 3 characters is being resized to give the illusion of height). However, if you are trying to make the screen resolution larger, trying to resize the images like this would lead to ugly effects like the picture below.
 |
The character outlines in magenta resemble the size of each pixel.
|
Rather than trying to force a mosaic image consisting of 3cm tiles on to a pattern of 1cm tiles, how about we shrink the tiles of that image into 1cm tiles and fit it onto the rest of the art. It doesn't have to be 3cm, it could be 7cm or 13cm or even 50cm! It dosen't matter! You can reduce them to 1cm tiles and fit them in.
Real space vs Visual space
Now that I have spent an entire point rambling about mosaic tiles, but now lets put it into practice with pixels. Say we want to put an 32x15 pixel image on to a 150x95 world, but we want to increase the size of the world so the player can see it better.
What I have learned from programming my JavaScript game is that you do not change the world or the objects' real size and position. It's a better idea to keep the two variables constant, I just mentioned the term 'real' size/position - by this I mean that the objects' size relative to the tiny pixels rather than relative to the player's eyes. Instead, you'll need to change the size at which both are being rendered, if you scale the aforementioned object and the world by 3 you will get a 96x75 image. A similar example can be seen below.

Unlike the last image of Bounty Hunter I where the pixel characters look inconsistent when they move, when you move the player in this scenario, all the pixels will be aligned or 'snapped' in place in respect to the real position of the player. The reason this is that, as I said before, despite the render size being changed, the player's real size and position stays the same as if it were if it was a 32x15 pixel image rather than a 96x75.
With this you can have pixel graphics in a video game where they look all cohesive, much like graphics on a SNES, PS1 or a hand held console, where all pixels are displayed in a consistent manner.
Lower level graphics
If you are making a game where you have control over where the pixels are drawn, that would be even easier because you can just state how large each pixel would be and draw the character in real space and let the engine calculate the character/object's exact pixel size on the screen.
This kind of thing would be useful if you are making a render engine in something like C++, where you do not have to work around any shenanigans that a 3rd party engine may have.
Conclusion
This has been a problem that I've been consistently seeing with pixel games nowadays, and there are rarely any tutorials on these kinds of things. The tutorials I've been seeing on topics like these show things that are way too unnessacarily complicated and conboluted. I'm not sure if this is the completely right way, but I think it works. If that is not the case then please let me know and explain your soloution in the comments.
Through what I have explored here, I would like to help others encountering the same or a similar problem and mention that it does not need to be complicated as it seems. I hope this has been useful to you and will allow you to have pixel graphics that do not look messy and unordered.
That's all from me!
No comments:
Post a Comment